EYEPACS LLC PHOTOGRAPHER MANUAL
TABLE OF CONTENTS
Photographer and Patient Communication
General Information about Diabetic Retinopathy
Performing a Diabetic Retinopathy Screening
Uploading Images to EyePACS
Screening Without the Internet
Useful Resources
Patient Spotlights
Importance of Good Data
Responsibilities of Site Administrators
Photographer and Patient Communication
Communicating with patients during the screening process is an essential yet challenging part of diabetic retinopathy screening.
Getting started:
- Explain what diabetic retinopathy is and its effect on the patient. For more information, refer to General Information on DR
- If accessible, show examples of retinal images. [Free flip charts here: http://catalog.nei.nih.gov/productcart/pc/viewPrd.asp?idcategory=32&idproduct=128 ]
- Show the patients the camera, provide them instructions and inform them the approximate duration of the screening.
During the process:
- Walk the patient through the process by updating him/her on how many pictures remain and provide encouragements.
- Possible problems and solutions:
- When witnessing signs of nervousness, allow a family member to accompany the patient to calm him/her down.
- If patient's eyes are watering, give the patient a break between photos, provide the patient with tissue and ask him to close and rest his eyes for a minute.
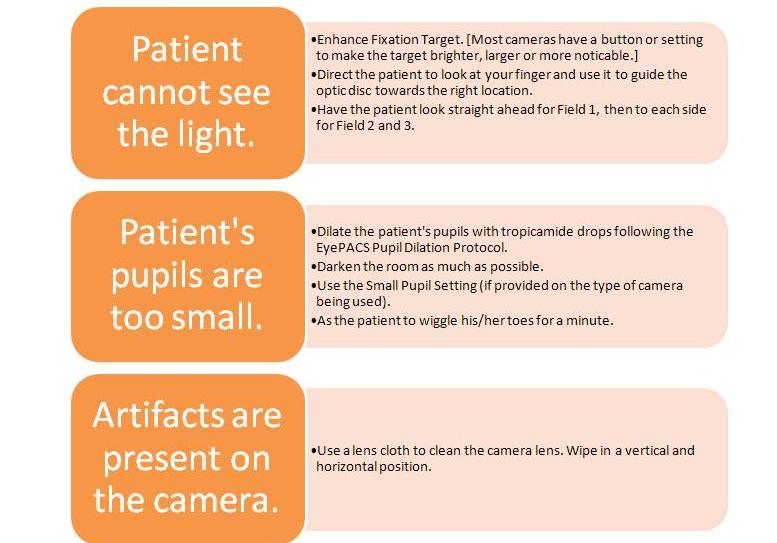
- If the pupils won't dilate:
- Give the patient a break between photos. Ask him to wiggle his toes for a minute. This movement causes pupils to dilate and also calms the patient by distracting him.
- Get the room to be as dark as possible.
- If accessible, drape a dark cloth over the patient's head.
- Have a clinic staff dilate the patient's eyes with dilating drops. (Pupil Dilation Protocol)
Finishing up:
- Inform the patient of when he can expect the results, and who will contact him.
General Information on Diabetic Retinopathy
What is Diabetic Retinopathy?
Diabetic retinopathy is the most common diabetic eye disease and a leading cause of blindness in American adults. It is caused by changes in the blood vessels of the retina.
If you have diabetic retinopathy, at first you may not notice changes to your vision. But over time, diabetic retinopathy can get worse and cause vision loss. Diabetic retinopathy usually affects both eyes.
What are the stages of Diabetic Retinopathy?
1) Mild Nonproliferative Diabetic Retinopathy: At this earliest stage, microaneuryms occur. They are small areas of a balloon-like swelling in the retina's tiny blood vessels.
2) Moderate Nonproliferative Diabetic Retinopathy: As the disease progresses, some blood vessels that nourish the retina are blocked.
3) Severe Nonproliferative Diabetic Retinopathy (NPDR): Many more blood vessels are blocked, depriving several areas of the retina with their blood supply. These areas of the retina send signals to the body to grow new blood vessels for nourishment.
4) Proliferative Diabetic Retinopathy (PDR): At this advanced stage, the signals sent by the retina for nourishment trigger the growth of new blood vessels. This condition is called proliferative retinopathy. These new blood vessels are abnormal and fragile. They grow along the retina and along the surface of the clear, vitreous gel that fills the inside of the eye. By themselves, these blood vessels do not cause symptoms or vision loss. However, they have thin, fragile walls. If they leak blood, severe vision loss and even blindness can result.
Who is at risk for diabetic retinopathy?
All people with diabetes both type 1 and type 2 are at risk. The longer someone has diabetes, the more likely he or she will get diabetic retinopathy. Between 40 to 45 percent of Americans diagnosed with diabetes have some stage of diabetic retinopathy. If you have diabetic retinopathy, your doctor can recommend treatment to help prevent its progression.
Diabetic retinopathy may also be a problem for pregnant women with diabetes. To protect vision, every pregnant woman with diabetes should have a comprehensive dilated eye exam as soon as possible. Your doctor may recommend additional exams during your pregnancy.
How does diabetic retinopathy cause vision loss?
Damaged blood vessels can cause vision loss in two ways:
1) Fragile, abnormal blood vessels can develop and leak blood in the center of the eye, blurring vision . This is
proliferative retinopathy and is the fourth and most advanced stage of the disease.
2) Fluid can leak into the center of the macula, the part of the eye where sharp, straight-ahead vision occurs. The fluid makes the macula swell, blurring vision. This condition is called macula edema. It can occur at any stage of diabetic retinopathy, although it is more likely to occur as the disease progresses. About half of the people with proliferative retinopathy also have macula edema.

Normal

Same scene viewed by patient with
diabetic retinopathy.
What can patient do to protect their vision?
- Every patient with diabetes should get a comprehensive dilated eye exam at least once a year and know that:
- Proliferative retinopathy can develop without symptoms.
- Macula edema can develop without symptoms at any of the four stages of diabetic retinopathy.
- Patients can develop both proliferative retinopathy and macula edema and still see fine. However, they are at high risk for vision loss.
- Whether or not you have symptoms, early detection and timely treatment can prevent vision loss.
- Patients with diabetic retinopathy may need more frequent eye exams.
- People with proliferative retinopathy can reduce their risk of blindness by 95% with timely treatment and appropriate follow-up care.
- Patients can have better control of blood sugar levels. The Diabetics Control and Complications Trial (DCCT) showed that better control of blood sugar levels slows the onset and progression of retinopathy. The people with diabetes who kept their blood sugar levels as close to normal as possible also had much less kidney and nerve disease. Better control also reduces the need for sight-saving laser surgery. This level of blood sugar control may not be best for everyone, including some elderly patients, children under age 13, or people with heart disease. Patients should ask their doctor if such a control program is right for them.
- Other studies have shown that controlling elevated blood pressure and cholesterol can reduce the risk of vision loss. Controlling these will help your overall health as well as help protect your vision.
References:
National Eye Institute: http://www.nei.nih.gov/health/diabetic/retinopathy.asp#1c
Performing a Diabetic Retinopathy Screening: Capturing Retinal Images
Overview:
The objective is to achieve the best readable images possible in a timely manner to best serve the patients
For each patient, there are a total of eight pictures taken four for each eye. Each eye includes one external and three internal images (each at a different field). The goal is to gain to the most complete view possible of the entire retina. The photographers are trained with emphasis on focus, position and lighting of each picture to obtain the best quality.
Photographers Credentialing:
Each EyePACS photographer must complete the certification process to ensure quality images. Training and certification not only guarantees easier image reading, but also provides photographers with enough experience to make their interaction with a patient faster and smoother. The objective is to complete the series of 8 photos in around 10 minutes, screening ~ 25 patients in 4 hours.
A Three-Step Process:
- Practice Case Module: complete a number of test cases (# set by EyePACs or site administrators).Capture retinal photos of non-patients (i.e., other clinic staff) and upload photos on a case by case basis onto the EyePACS photographer certification website. A minimum of eight images (not mandatory) are expected: four images for each eye. The following types of images are expected: Right External, Right Internal Field 1, Right Internal Field 2, Right Internal Field 3, Left External, Left Internal Field 1, Left Internal Field 2, Left Internal Field 3.[For reference, please refer to Sample Images of Right Eye/Left Eye]. The test cases will be reviewed by an EyePACS administrator who will choose to pass or fail the test case. If the candidate does not pass the test case, feedback will be provided to increase the quality of the images until he/she uploads images with the desired quality consistently.
How to Upload a Test Case:
- Site Administrator create an account for the candidate on www.photographer.eyepacs.com
- The candidate must "Log In"
- Click on Practice Cases
- Click on tab: Add a Practice Case
- Click on Choose Files
- Click on Save Images
- Submit case for review

- Test Questions Module: take the online test. Upon completion of good, readable quality test cases, the candidate will receive notification that he/she is ready to take the online test. To pass the test, the candidate must answer all the questions correct. If candidate fails the test, a test review will be presented with explanations of the correct answers. The candidate will then have the option to retake the test. Please note that the test may be taken as many times as needed.
How to take online test:
- Receive a certificate. Upon completion of the two modules, photographers will receive a certificate in the mail stating they are certified with the EyePACS program. (Please make sure the address for future contact is updated under "My Profile" on the EyePACS Photographer Credentialing website.) With a certificate, they are approved to begin diabetic retinopathy screening of patients
Anatomy of Retina

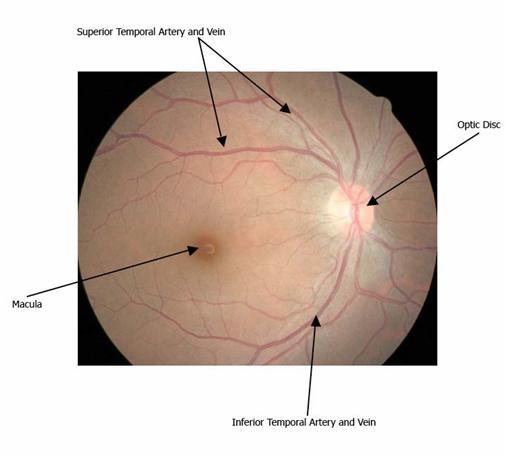 Prepping the Camera
General information:
1) The retinal screening camera has two components: a fundus camera (to focus the image) and the camera back (the electronic sensor that converts the light image to a digital image).
2) The fundus camera sits on top of an adjustable table stand. NOTE: The camera should be placed so that the lens is pointed in the direction of the patient. The up and down button found on the table stand is pointed toward the photographer.
3) Keep fingers and noses AWAY from the delicate big lens in front of camera! Do NOT attempt to clean them without proper equipments.
Set up:
1) Plug the fundus camera into the outlet.
2) Turn on the power switch on the fundus camera.
3) Plug the table stand into the outlet.
4) Turn the power switch on the table stand.
Capturing External Photos (if applicable with the type of camera):
Set Up:
1) Clean Chin Rest and Forehead Brace with alcohol wipes.
2) Position patient comfortable in front of camera. (If the camera is set on a power table, adjust the table height using "up/down" lever on table stand.)
3) Ask patient to rest their chin onto Chin Rest with their forehead an inch away from Forehead Brace.
4) Line up the patient's eye at the Height Adjustment Mark. Adjust height accordingly. (Use Chin Rest Buttons or Height Adjustment knobs if applicable with camera).
Capturing:
1) Always capture the right eye first by moving platform to the left.
2) After capturing, make sure images are clear and in focus for better detection of cataracts and other abnormalities. Make sure the image captures the entire eye with the iris, pupil and sclera (the white part of the eye).
3) Switch to the left eye by moving the platform to the right.
Capturing Internal Photos
Set Up:
1) Clean Chin Rest and Forehead Brace with alcohol wipes.
2) Ask the patient to rest chin onto Chin Rest with the forehead against and touching the Forehead Brace.
3) If applicable with the type of camera, make adjustments on the camera for high eyeglass prescriptions or small pupils (Place a link to common image problems here).
Capturing:
1) Always capture images of the right eye first by moving platform to the left.
2) Position the target onto the center of the pupil. To do so, move target up or down using the Chin Adjustment Buttons; move target left or right using the Operation Lever/Joystick. Position the camera properly to avoid artifacts and shadows.
3) Direct patient to focus on the internal light at all times. If the patient cannot see the light, move your finger and ask patient to look at it to position the eye properly. If patient still cannot see, have him/her look straight ahead and keep the eyes steady.
4) Review the image on the screen to make sure it is clear, sharp, free of artifacts, and is not too bright or too dark. If the image is not adequate, retake the photo for that eye.
5) Alternate between the right and left eye by moving the camera platform to the left and right. Repeat steps 1-4 for each field.
***Note: The various functions noted above may vary depending on the type of camera being used. If the camera is automatic, just simply enter the required patient information, direct the patient to focus on the internal light at all times, and wait for the camera to do the work! Depending on the type of camera, you may be able to adjust the duration between each picture to give the eye some time to rest and dilate.
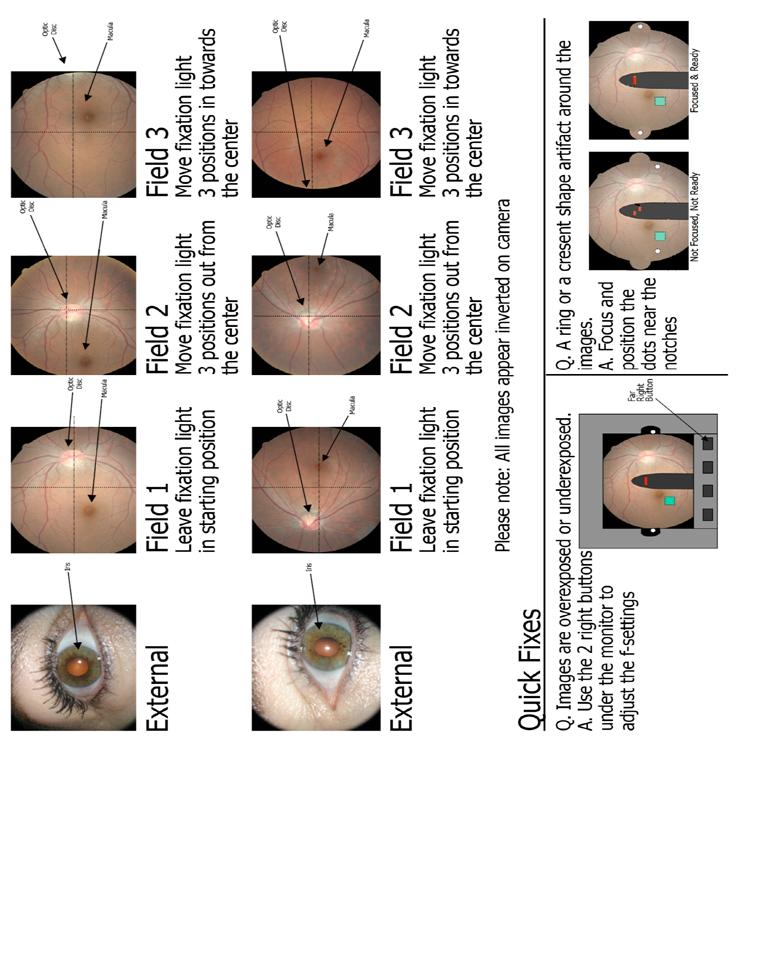
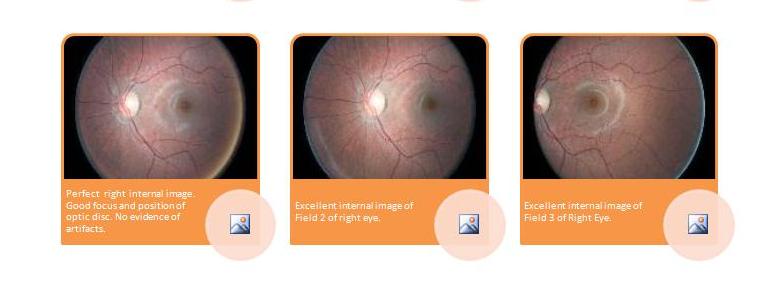
Sample images of the Right Eye:
1) External: Fundus Reflex
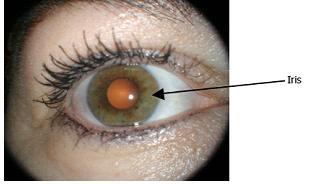
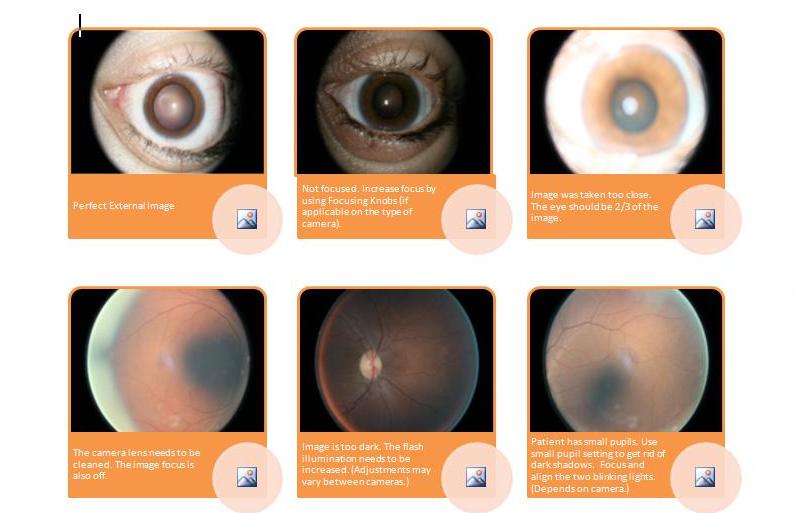
The eye should take up 2/3 of the screen as pictured.
[If applicable with the type of camera: use Focus Knob to focus iris detail, pull out/down Diopter Lever completely, have the head positioned one inch away from Forehead Rest.]
2) Internal, Field 1: Macula

The optic disc and the macula should be equal distance from the center. The macula is to the left of the optic disc on the screen.
[If applicable with the type of camera: pull in/up the Diopter Lever completely, have the head positioned against the Forehead Rest.]
3) Internal, Field 2: Disc
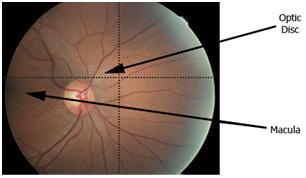
The optic disc is near the center. The macula is slightly left of the optic disc on the screen.
[If applicable with the type of camera: pull in/up the Diopter Lever completely, have the head positioned against the Forehead Rest. Shift fixation target 3 times to the left.]
4) Internal, Field 3: Temporal to Macula
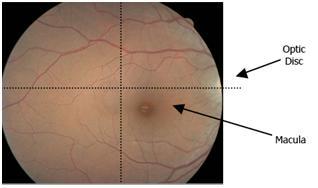
The optic disc is should be far right of the retina. The macula is should be below and slightly right of the center as pictured.
[If applicable with the type of camera: pull in/up the Diopter Lever completely, have the head positioned against the Forehead Rest. Shift fixation target 3 times to the right.]
Sample images of the Left Eye:
1) External: Fundus Reflex
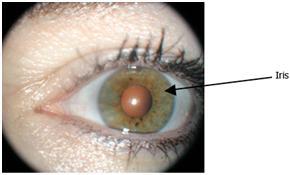
The eye should take up 2/3 of the screen as pictured.
[If applicable with the type of camera: use Focus Knob to focus iris detail, pull out/down Diopter Lever completely, have the head positioned one inch away from Forehead Rest.]
2) Internal, Field 1: Macula

The optic disc and the macula should be equal distance from the center. The macula is to the right of the optic disc on the screen.
[If applicable with the type of camera: pull in/up the Diopter Lever completely, have the head positioned against the Forehead Rest.]
3) Internal, Field 2: Disc

The optic disc is near the center. The macula is slightly right of the optic disc on the screen.
[If applicable with the type of camera: pull in/up the Diopter Lever completely, have the head positioned against the Forehead Rest. Shift fixation target 3 times to the right.]
4) Internal, Field 3: Temporal to Macula
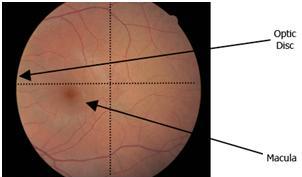
The optic disc is should be far left of the retina. The macula is should be below and slightly left of the center as pictured.
[If applicable with the type of camera: pull in/up the Diopter Lever completely, have the head positioned against the Forehead Rest. Shift fixation target 3 times to the left.]
Common Problems and Solutions:
1) Photos are too light or too dark. Adjust the flash illumination on the fundus camera by pressing on Flash Illumination buttons. For lighter skinned patients, patients with a light colored iris, or patients with big pupils, use a lower flash illumination. For darker skinned patients, patients with a dark colored iris, or patients with small pupils, a higher flash illumination is required.
2) Dark shadows on the picture. The pupils are not dilated enough so you can do the following:
- Get room to be as dark as possible (ie. Close the blinds, put black coverings over windows, turn off all the lights, etc.)
- Wait for the pupil to dilate more. Ask the patient to wiggle his/her toes and close their eyes for a minute.
- Increase the flash illumination.
- Use Small Pupil setting.
- NOTE: This helps eliminates central shadows for some patients but it should not be used all the time because it degrades images slightly. Capture without this whenever possible.
- Dilate patient's eyes with tropicamide drops (necessary for older patients) following the EyePACS dilation protocol. Ask a clinician or mid-level staff member to perform this
3) Patient cannot see the target light.
- Enhance the Fixation Target (most cameras have a button or setting to make the target brighter, larger, or more noticeable).
- Ask the patient look at your finger with the other eye. Guide the optic disk toward the right location.
- Have the patient look straight ahead for field 1, then to each side for fields 2 and 3.
4) Artifacts from the camera are present on images. Clean the camera lens by using a lens cloth. Wipe it in a vertical and horizontal motion. BE EXTRA CAREFUL because the lens is delicate!
5) Patient blinks a lot.
- Ask the patient to blink twice and then take the photo right after the second blink.
- Give patient lubricating eye drops to moisten their eyes.
Pupil Dilation Protocol
Policy:
Patients will undergo pharmacological pupillary dilation with one drop per eye of 1% tropicamide solution when retinal images are of insufficient quality for interpretation. No risk factors exist for complications from pupillary dilation.
Background:
Approximately 10% of images that are acquired without pupillary dilation with non-mydriatic retinal cameras cannot be appropriately interpreted by clinicians due to poor image quality. Two factors that affect image quality are small pupil size and media opacities, such as cataracts. These limitations can be overcome by temporarily increasing the pupil size with pharmacological agents. Better images can acquired more quickly when pupils are dilated, particularly with older patients, since they are more likely to have small pupils and media opacities. Pharmacological dilation, however, can have adverse effects.
The most common adverse effects are photophobia (sensitivity to light) and cycloplegia (inability to change focus, usually causing near blur). Other adverse effects are much less common, and include hypersensitivity, which can cause conjunctival and corneal inflammation and ocular infection from contact with contaminated eye drops. Pupillary dilation has occasionally been reported to cause acute angle closure glaucoma, a painful sight-threatening condition. The use of two dilating agents used in combination for full pupillary dilation have been reported to potentially cause angle closure in approximately one out of five thousand individuals. There have been no reported cases of angle closure caused by using a single dilating agent. One drop per eye of 1% tropicamide can be used as a single agent to provide adequate dilation for retinal photography. Onset of pupillary dilation is approximately 15 minutes and photophobia and cycloplegia will typically last from two to four hours, although rare individuals may experience pupil dilation for up to three days.
Procedure:
If pupillary dilation is necessary and required for better images, please do the following:
1) Photographer or qualified health care personnel determines that patient does not:
- have a personal history of glaucoma
- have significant redness, irritation, or discharge from eye
- is not pregnant
- is not wearing contact lenses
- has not had a previous adverse reaction to pupillary dilation
2) Inform patient that one drop will be instilled in each eye to increase pupil size. He/She may experience blurred vision and light sensitivity for two to four hours. He/She must be careful when driving or performing other potentially dangerous activities until the effect wears off. In rare instances, the effects may last for two days.
3) Discard the bottle of drops if the nozzle appears discolored or contaminated. DO NOT use expired eye drops.
4) Hold the bottle a half inch to one inch from the eye while instilling drop. If simultaneous contact occurs with the drops, the eye and the bottle, then the drops should be discarded due to contamination.
5) Patient can pat eyes dry with a tissue gently without rubbing the eyes vigorously.
6) Wait about 15 minutes for drops to take effect.
7) After photography, give the patient plastic sun shields before leaving the clinic to avoid light sensitivity.
References:
ADA Guidelines on Diabetic Retinopathy Screening.
Murgatroyd H, Ellingford A, Cox A, Binnie M, Ellis J, MacEwen C, Leese G. Effect of mydriasis and different field strategies on digital image screening of diabetic eye disease. Br J Ophthalmol 2004;88:920-924.
Pandit R, Taylor R. Mydriasis and glaucoma: exploding the myth. A systemic review. DiabetMed 17, 693-699 (2000).
Uploading Images
1) Depending on the type of camera, the way to transfer the images from the camera to the computer may vary:
-
If applicable, remove the compact flash card from the camera and insert it carefully into a compact flash card reader attached to the USB drive on the computer.
-
Use a USB stick to transfer the pictures from the camera onto a computer
-
Directly connect the camera to the computer using a USB cable.
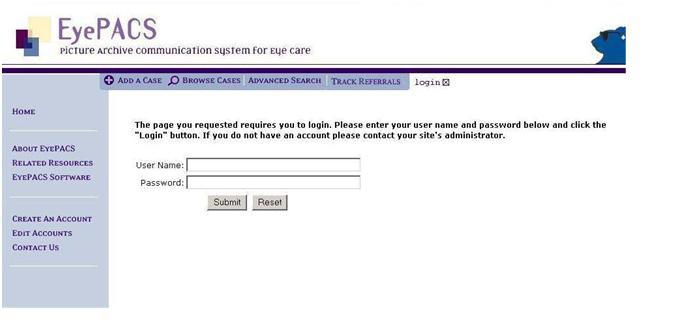
2) Go to https: //www.eyepacs.org and login. Select "Add a Case" tab at the top of the page.
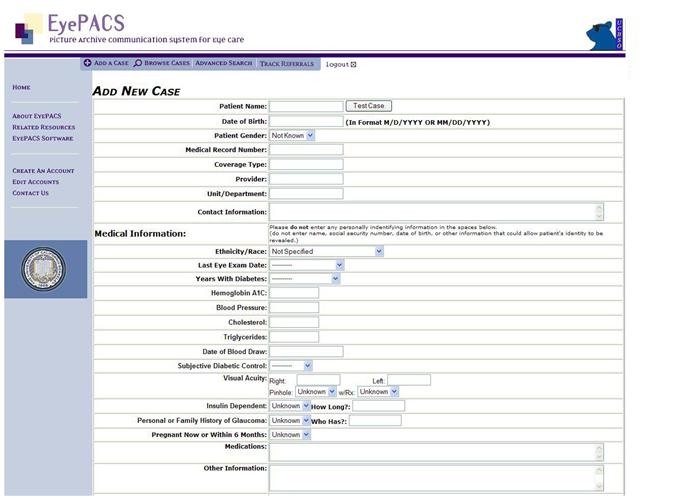
3) Enter patient information. Please be complete and accurate. Enter the following information:
- Name
- Date of Birth
- Gender
- Coverage type
- Ethnicity
- Date of last eye exam (approximate, OK to ask patient)
- Duration of diabetes since date of diagnosis (approximate, OK to ask patient)
- History of glaucoma
- Pregnancy status
The following information is also important and should be included if available:
- HbA1C and/or subjective control as reported by patients
- Insulin dependence
- Length of insulin consumption
- Visual acuities
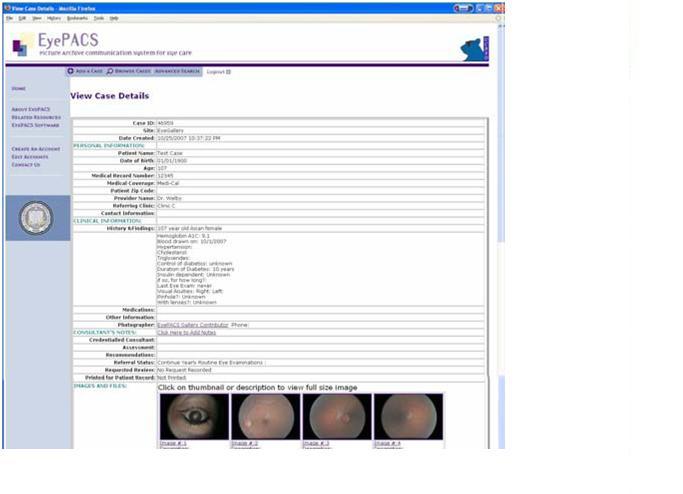
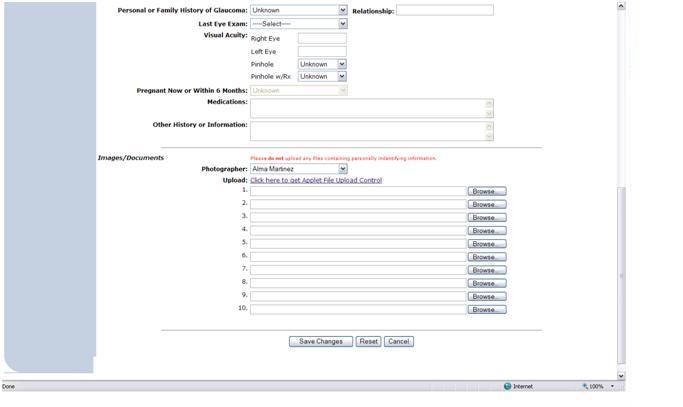
4) To upload the images, go to "Upload" section at the bottom of the web page. Navigate to the images saved on the flash memory card/USB stick/camera by selecting the "Browse" button (identified by "<1" below). Select the option to "View thumbnail" ("<2" below) in the file upload window. Repeat this step until all images are uploaded.
5) Upload all right eye images then the left eye images. For example, images 1,3,5,7 should be uploaded first. After all images are uploaded, select "Save changes" (indicated by "<3" below) at the bottom of the web page.
***Note: DO NOT click "Save Changes" repeatedly. Internet connection speed may be slow.

6) Uploading is complete when you see "View Case Details" page with thumbnail images of retinal images you captured.
Screening without the Internet
When necessary to conduct a diabetic retinopathy screening without the internet, please follow the steps below:
1) Have the patient complete a Diabetic Retinopathy Screening Encounter Form.
2) Write the patient's name on a piece of paper or obtain a paper with the patient's name on it. Hold the patient's name in front of the retinal camera and take a picture of it before taking any photographs.
3) Take the pictures.
4) Upload and save the images to a file on a computer (remember to categorize the images correctly by patient names).
5) Upload the pictures to EyePACS when you regain Internet connection.
Useful Resources
Diabetic Retinopathy Screening Encounter Form:

DRS Cheat Sheet :
Good Pictures vs. Bad Pictures:
Tips & Tricks for DR Screening:

Patient Spotlights
Remember that this program is about preventing blindness and changing people's lives. There are a number of stories of patients whose eyesight was saved because they were given a routine retinopathy screening through the EyePACS program. Here are their stories
-
A woman with relatively low blood sugar levels came in for a regular appointment and was not experiencing any vision problems. A scan of her retina revealed that she had significant hemorrhagic occlusions. The photographer noted the abnormality and called EyePACS to expedite the reading. The patient was referred to an ophthalmic surgeon to schedule immediate intervention. She was later told by the doctor that she could have gone blind within a week. Fortunately, an insistence on routine scanning for asymptomatic patients, the availability of an on-site camera, and rapid turnaround for readings saved this woman's sight.
-
A patient came in as a walk-in complaining about some loss of vision in one eye. When the photographer reviewed the images of the patient's eye, he witnessed serious hemorrhaging. The images were sent to EyePACS and the patient immediately referred to an ophthalmologist. Despite the bleeding, the doctor caught the problem in time, and was able to treat the patient.
-
A non-diabetic patient complained of vision problems, so his clinic made a referral appointment for him to see an eye doctor whose earliest availability was in four months. The photographer suggested that they should go ahead and capture some images and uploaded the images to EyePACS. The reader of the images called while the patient was still in the clinic and informed the patient that he needed a specialist immediately. The specialist then confirmed that he had an aggressive brain tumor.
-
One physician was skeptical about the program because he did not want to burden his medical assistant with more responsibilities. An EyePACS photographer performed a screening on one of the physician's patients who had never had an eye exam before. They uncovered serve retinopathy that the provider would never have caught without this technology. The patient received an immediate referral, and this provider is now a strong advocate for routine DRS.
-
One clinic's first patient was a 14 year-old diabetic boy who refused to watch his blood sugar. His screening revealed a hemorrhage in his eye, leaving the mother upset and the child very surprised. This realization then affected his willingness to try to manage his blood sugar better. The prospect of diabetes affecting something so real- a person's eyesight can definitely motivate people to take better care of themselves.
Importance of Good Data
What are good data in terms of EyePACS?
Good data are data that help ensure that diabetic retinopathy is an effective method of treatment, support its sustainability in a clinical setting, and inform telemedicine policy.
What fields are necessary for the collection of good data?
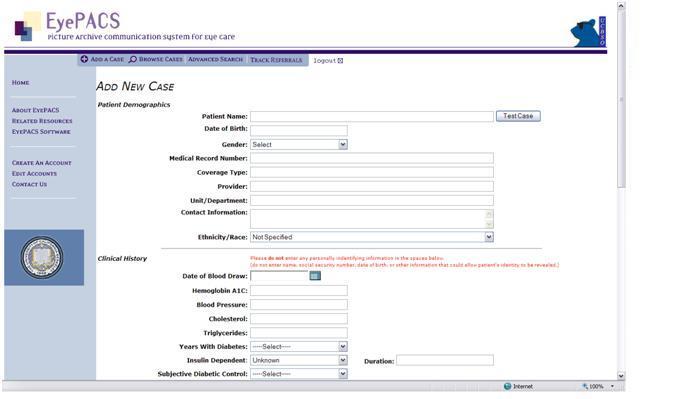
The following information must be obtained to ensure the collection of good data:
- Patient name
- Date of Birth
- Gender
- Coverage type
- Ethnicity/Race
- Years with Diabetes
- Insulin Dependency and Duration
- Hemoglobin A1c
- Last Eye Exam
- Pregnancy Status within last six months
What other data should be reported to the EyePACS team?
1.Patient stories: For example, a story about someone who would have otherwise gone blind if they had not been screened.
2.Process stories: Stories about what does and does not work when recruiting patients, scheduling screening and tracking referrals.
3.Screening events: How smoothly does the camera move from one location to another, if at all? How successful are screening days? What do patients think of special screening and education events?
Responsibilities of Site Administrators
Overview of Objectives
The overall objective for EyePACS administrators is to manage the user experience in the clinic, including the creating of new user accounts and implementing any site changes. Each clinic (site) should contain individual accounts for all photographers, consultants, site clinicians, outside clinicians, and anyone involved in the implementation of the EyePACS program in the clinic setting. Each site administrator is responsible for maintaining the clinic's information in EyePACS and ensuring that there is no misuse of login privileges.
Login
To perform any action as a site administrator, log into the EyePACS system.

Adding New Users
1) On the side menu of the EyePACS website, select "Edit Accounts."
2) The EyePACS Administration options will appear.
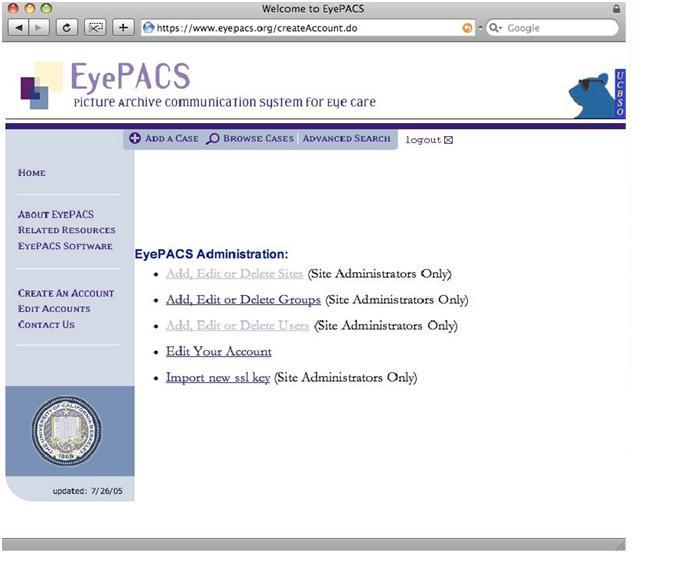
3) Select Add, Edit or Delete Users
4) The next screen will display a list of all users in the EyePACS system. Use Site Filter to select your specific site to which you are adding a new user.

5) Once you have selected the site, only users of that site will appear. In the example below, the selected is SAMPLE SITE.
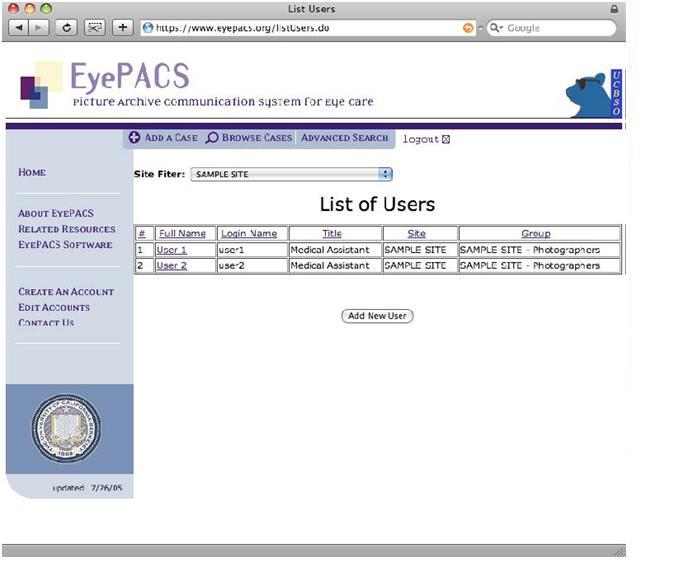
6) Select Add New User
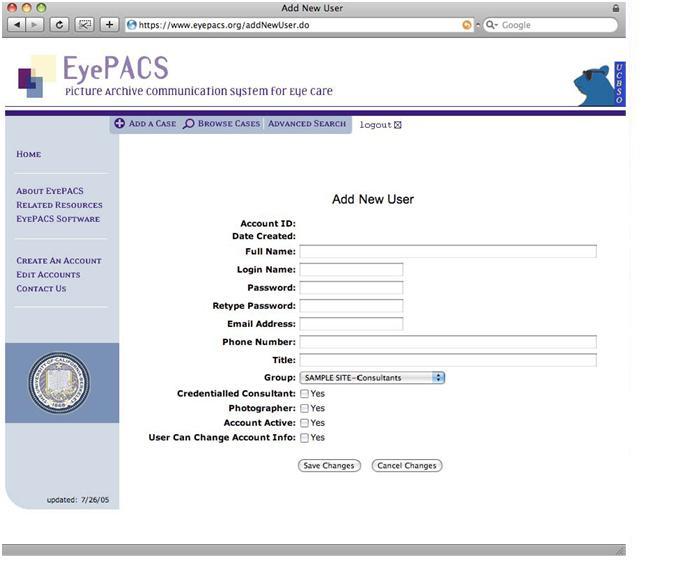
7) When the "Add New User" fields appear, enter information into all fields.
- Group generally most users will be Photographers
- Credentialed Consultant Only checked for those who are credentialed image readers.
- Photographer select this is user is a photographer.
- Account Active- select this for new users. This can be unchecked if user is no longer needing access to EyePACS system (i.e. if employee leaves the clinic).
- User Can Change Account Info not recommended. All changes should be made by site administrator.
Editing Profile Information
1) On the side menu of the EyePACS website, select Edit Accounts
2) The EyePACS Administration options will appear.

3) Select Add, Edit, Delete Users.
4) Use Site Filter to select specific site.

5) Once selected site, only users for that site will appear. For the example below, SAMPLE SITE is the selected site.

6) Select user name to edit account information. Here, you can also change the Role of the user.
7) Make changes and select "Save Changes".
8) The List of Users will be displayed and edits will be saved.
Adding Sub-Sites
Sub-sites are used for organizations that have multiple site locations. Each site should have its own location listed with its own set of users.
1) On the side menu of the EyePACS website, select Edit Accounts.
2) The EyePACS Administration options appear.

3) Select Add, Edit, or Delete Sites.
4) The complete list of sites will appear. Scroll down to the bottom of the list and click Add New Site.
5) Enter all data for new site.
6) To differentiate the new site from the parent site, label the location appropriately.
7) Select Parent Site Name in the drop down menu.
8) Default Private Selection Value should be left unchecked.
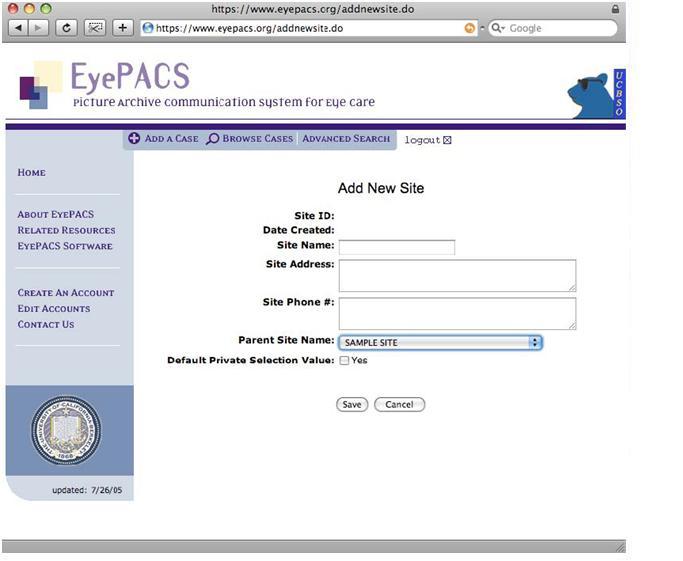
9) Click Save. The list of sites will appear.
